Snagboot Boot and Flash eMMC Instructions
- Table of contents
- Snagboot Boot and Flash eMMC Instructions
Snagboot is an open-source tool used to recover and/or flash embedded platforms. It supports both of the dfu and fastboot protocols.
Note: DFU alone can be used to boot and flash the SOM by itself. However due to the current u-boot implementation the throughput is only ~2.6MB/s. By switching to the fastboot protocol after reaching u-boot, we can flash at ~25.8MB/s saving significant flashing time. Fastboot also supports the android sparse image format so if the image file is created properly, it can skip sending large chunks of zeros or ones saving more time.
The following instructions are compatible for the MitySOM-AM62x, MitySOM-AM62A, and MitySOM-AM62P.
References
- https://github.com/bootlin/snagboot
- https://docs.u-boot.org/en/latest/usage/dfu.html
- https://en.wikipedia.org/wiki/Fastboot
- https://www.2net.co.uk/tutorial/android-sparse-image-format
- https://docs.u-boot.org/en/stable/android/fastboot.html#android-fastboot
Prerequisites
- Make sure your client device is connected to the host via Dual Role Port (J7 on devboard).
- Clear the eMMC
- Recent versions of Ubuntu include pipx to manage python applications
Step 1: Installing Snagboot
Reference: https://github.com/bootlin/snagboot?tab=readme-ov-file#installation-on-linux
- Install using pipx. This will auto create a virtualenv and add snagfactory/snagflash/snagrecovery to your users PATH
$ pipx install snagboot[gui]
- Check that snagboot has been installed and you have access to snagboot commands
$ snagrecover -h
$ snagflash -h
- Install udev rules so that snagrecover has read and write access to the USB devices exposed by the SoCs.
$ snagrecover --udev > 50-snagboot.rules
$ sudo cp 50-snagboot.rules /etc/udev/rules.d/
$ sudo udevadm control --reload-rules
$ sudo udevadm trigger
Step 2: Build/Copy the boot files to be flashed to eMMC
Ensure that you are copying these files without the dfu changes described in "Build a Snagboot Compatible U-boot".
Note: Change the directory name if you are creating this for the 62/62a/62p
- Make snagboot project directory
$ mkdir <WORK_DIR>/am62_snagboot
$ cd <WORK_DIR>/am62_snagboot
$ mkdir dfu_files emmc_files
- Run the u-boot build as described in U-Boot Building for MitySOM-AM62
- Copy the necessary boot files to your
emmc_filesdirectory$ cp <U-BOOT_DIR>/build-mitysom_am62x_devkit/a53/u-boot.img <U-BOOT_DIR>/build-mitysom_am62x_devkit/a53/tispl.bin <U-BOOT_DIR>/build-mitysom_am62x_devkit/r5/tiboot3.bin <WORK_DIR>/am62_snagboot/emmc_files
- Follow the instructions listed in Building a Yocto Filesystem to generate an ext3 file image
- Copy the ext3 file image to your
am62_snagbootfolder$ cp <YOCTO_DIR>/build/deploy-ti/images/mitysom-am62x/tisdk-default-image-mitysom-am62x.rootfs.ext3 <WORK_DIR>/am62_snagboot/
- Convert the ext3 file to a sparse file
$ img2simg <file.ext3> rootfs.ext3.sparse
Note: img2simg can be installed viasudo apt install android-sdk-libsparse-utils - Check your project directory and make sure your sparse and boot files are present
$ ls
dfu_files  emmc_files  myenv  <file.ext3>  rootfs.ext3.sparse  snagboot
$ ls emmc_files/
tiboot3.bin  tispl.bin  u-boot.img
Step 3: Build/Copy a Snagboot Compatible U-boot
- Update the build script and create the necessary binaries
- make -j"$(nproc)" "$MV" ARCH=arm CROSS_COMPILE=arm-none-linux-gnueabihf- O="$R5_BUILDDIR" "${MACHINE}_r5_defconfig" + make -j"$(nproc)" "$MV" ARCH=arm CROSS_COMPILE=arm-none-linux-gnueabihf- O="$R5_BUILDDIR" "${MACHINE}_r5_defconfig" am62x_r5_usbdfu.config - make -j"$(nproc)" "$MV" ARCH=arm CROSS_COMPILE=aarch64-none-linux-gnu- O="$A53_BUILDDIR" "${MACHINE}_a53_defconfig" + make -j"$(nproc)" "$MV" ARCH=arm CROSS_COMPILE=aarch64-none-linux-gnu- O="$A53_BUILDDIR" "${MACHINE}_a53_defconfig" am6x_a53_snagfactory.config - Run the build script
- Download firmware binaries .yaml file to the am62_snagboot directory: snagrecover-am62xx.yaml
- Copy the necessary binaries to your snagboot directory
$ cp build-mitysom_am62x_devkit/a53/u-boot.img build-mitysom_am62x_devkit/a53/tispl.bin build-mitysom_am62x_devkit/r5/tiboot3.bin <WORK_DIR>/am62_snagboot/dfu_files
- Check that all files have been copied to the correct directory
$ ls
dfu_files  emmc_files  myenv  <file.ext3>  rootfs.ext3.sparse  snagboot  snagrecover-am62xx.yaml
$ ls dfu_files/
tiboot3.bin  tispl.bin  u-boot.img
Step 4: Setup the device to boot from DFU
- Connect the device and host computer with a USB cable.
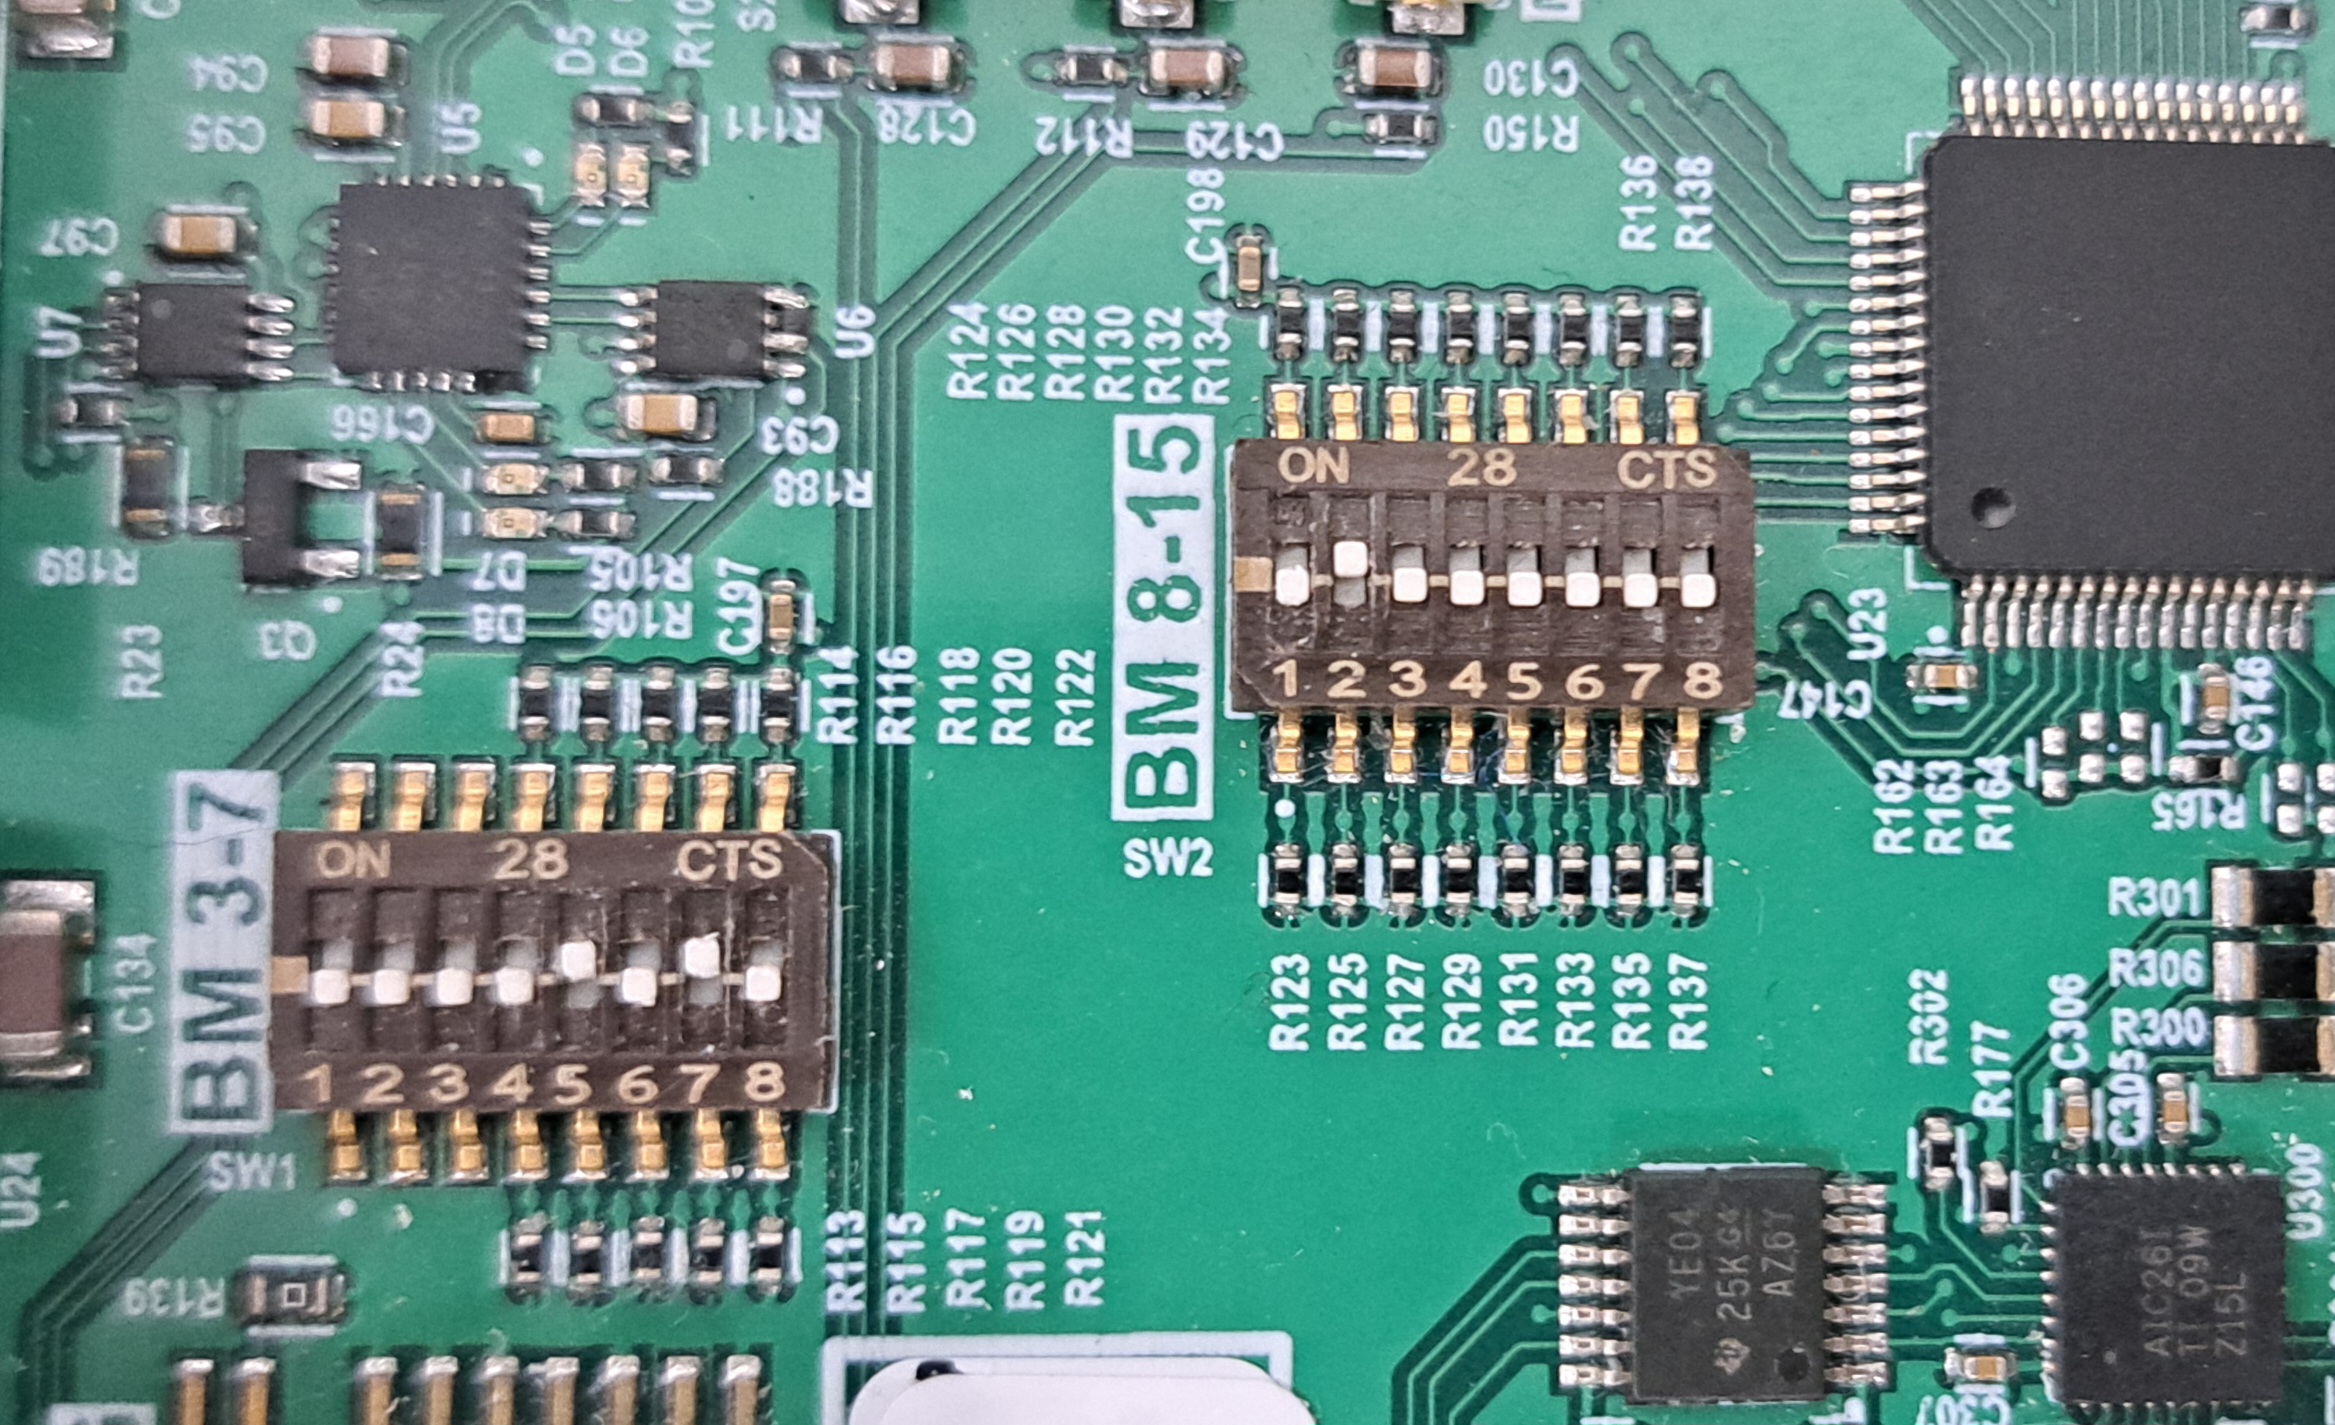
- Set the boot switches to DFU/Snagboot mode. Switches: SW1 = [00001010] SW2 = [01000000].
- Turn on the device.
- Find your device id. (This checks if your board is detected by the host pc)
$ lsusb
...
Bus 003 Device 041: ID 0451:6165 Texas Instruments, Inc. USB download gadget
...
Note: Your device will not appear unless you are in dfu boot mode
Step 5: Boot to U-boot Using Snagrecover
The snagrecovery step handles loading the bootloader into RAM to prep for flashing the emmc in the next stage.
- Run snagrecover command and boot to u-boot prompt
$ snagrecover -s <am625/am62a7/am62p> -f snagrecover-am62xx.yaml
- Your Serial Port terminal should have the following output: Terminal Output
Step 6: Flash the eMMC using Snagflash
- Run snagflash command and flash the sparse file
$ snagflash -P fastboot -p 0451:6165 -f oem-format
$ snagflash -P fastboot -p 0451:6165 -f flash_sparse:rootfs.ext3.sparse:rootfs --timeout 500000 #fastboot timeout value can be updated with the --timeout flag
- Your Serial Port terminal should have the following output: Terminal Output
- Flash the necessary binaries
$ snagflash -P fastboot -p 0451:6165 -f download:emmc_files/tiboot3.bin -f flash:tiboot3
$ snagflash -P fastboot -p 0451:6165 -f download:emmc_files/tispl.bin -f flash:tispl
$ snagflash -P fastboot -p 0451:6165 -f download:emmc_files/u-boot.img -f flash:uboot
- Your Serial Port terminal should have the following output: Terminal Output
- Enable the boot partition of the eMMC device
$ snagflash -P fastboot -p 0451:6165 -f ucmd:"mmc partconf 0 1 1 1"
$ snagflash -P fastboot -p 0451:6165 -f ucmd:"mmc bootbus 0 2 0 0"
- Expected output
dwc3-generic-peripheral usb@31000000: request 00000000f7f07580 was not queued to ep1in-bulk
Set to BOOT_BUS_WIDTH = 0x2, RESET = 0x0, BOOT_MODE = 0x0
dwc3-generic-peripheral usb@31000000: request 00000000f7f07580 was not queued to ep1in-bulk
- Expected output
- To boot the linux kernel follow steps outlined below in "Booting to the Linux Kernel"
Using Snagfactory
Reference: https://github.com/bootlin/snagboot/blob/main/docs/snagfactory.md
Snagfactory is a tool for simultaneous and efficient recovery and flashing of multiple embedded devices. It leverages the support range of Snagboot along with the multithreading capabilities of the host machine.
- Install Snagfactory
$ cd <SNAGBOOT_CLONE_DIR>
$ ./install.sh --with-gui
$ cd ..
- Download the snagfactory configuration file to your project directory: snagfactory-config.yaml
- Your project directory should look like the following
$ ls
am62xx-binaries.yaml  dfu_files  emmc_files  myenv  <file.ext3>  rootfs.ext3.sparse  snagboot  snagfactory-config.yaml
- Launch Snagfactory
$ snagfactory
- The following gui should appear
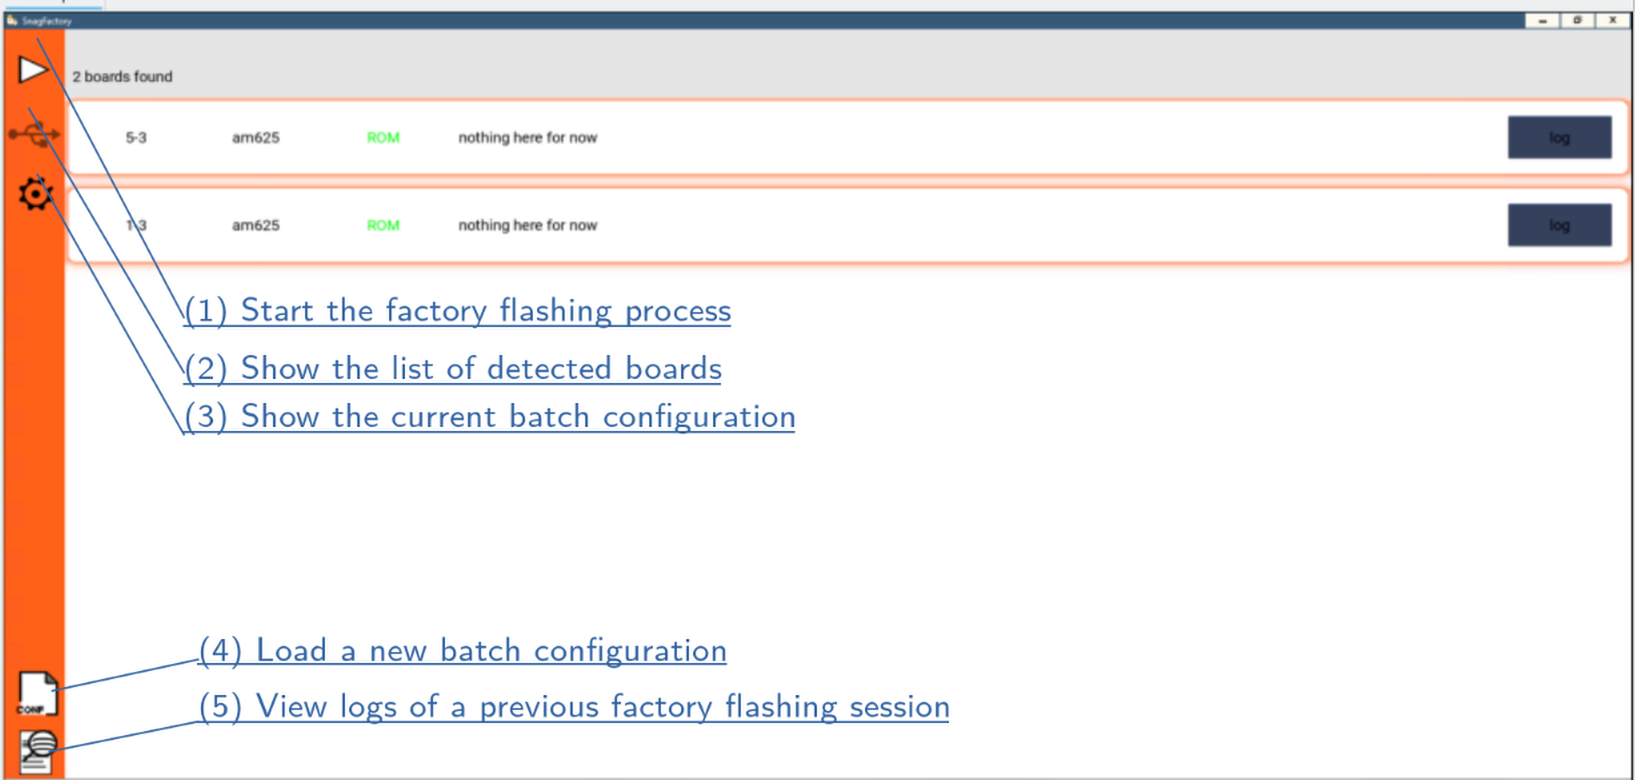
- Navigate to "(4) Load a new batch configuration" and load the "snagfactory-config.yaml" file
- Navigate to "(2) Show the list of detected boards," your board should now appear there.
- The following gui should appear
- Select the "Start" button and your board should successfully load u-boot over dfu, partition the emmc, flash the sparse file image, and flash the necessary binaries for booting.
Booting to the Linux Kernel from eMMC
- Ensure that there is no SD card in the dev board.
- Power off the device and set the boot pins to eMMC mode as described in Boot eMMC
- Power on the board and you should now boot to the linux kernel
Troubleshooting
- For trouble getting to the u-boot prompt follow the DFU_boot wiki page to make sure recovery binaries are functional
- If the snagflash command does not work try using the following fastboot commands
fastboot flash rootfs rootfs.ext3.sparse
fastboot flash tiboot3 emmc_files/tiboot3.bin
fastboot flash tispl emmc_files/tispl.bin
fastboot flash uboot0 emmc_files/u-boot.img
- If these run successfully then there are no problems with your emmc files
- If snagrecover is getting stuck in u-boot at the following line
Warning: Did not detect image signing certificate. Skipping authentication to prevent boot failure. This will fail on Security Enforcing(HS-SE) devices
Warning: Did not detect image signing certificate. Skipping authentication to prevent boot failure. This will fail on Security Enforcing(HS-SE) devices
Success has been made by creating a new project directory and python virtual environment. Essentially start over from the beginning.
Summary
This wiki page has demonstrated the following:- Installing Snagboot from the github repository
- Boot the devkit in DFU/Snagboot mode and create a snagboot compatible u-boot
- Run snagrecover to boot to u-boot prompt and snagflash to flash a sparse file, and necessary binaries to the client device.
- Use snagfactory to boot the client device to the U-Boot prompt, then flash the sparse file and any necessary binaries to the device.
Validated SDK's and Platforms
The following instructions have been tested on: SDK 10.01 for the am62x/a/p and SDK 11 for the am62x/p
Go to top

